Friday 27 August 2021

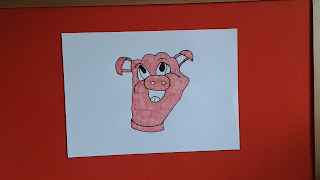
Pig Palm Art

  Age Range: 4-11

Equipment needed: A4 sheet paper, black, pink, red and blue felt tip pen
 
Pig Palm Art 
 
Have you ever wanted to learn how to draw a pig? Well you can do this, simply by using the palm of your hand. ✋🐷

To draw your pig:
 
 Place your left hand on the piece of paper with your thumb tucked in similar to the image below
 
Draw round your hand

 Draw a line at the bottom for the face of the pig. Add two horns on either side of your hand drawing.
 
Add an oval in the middle of your pig drawing for the nose and then add two small circles quite close to each other for the pig's nostrils.

 For the eye, draw a line from the nose heading downwards. Draw an oval close to the top of this line similar to the image below.
 
Similar to the eye you have drawn, do the same thing for the other eye to the right of what you have drawn
 
 In the eyes you have drawn, draw an oval in each of them
 
Colour the ovals you have just drawn with a black pen

 Add a line each on both of the eyes for the eyebrows. Add the mouth similar to the image below making sure you add a small oval with two sections in the mouth.
 
Add a small row at the bottom of your pig drawing for the pig's neck

 Colour the face, neck, ears and nose with a pink pen
 
Colour the bottom of the mouth in with a red pen

 Colour the remaining part of the eyes in with a blue pen and the top half of the mouth with a black pen

 You have drawn your own pig palm art

 
Watch the pig palm art video:
 

Thank you and hope you enjoyed the blog post. Please leave in the comments how you found drawing your own pig as well as any feedback you may have. Please also leave in the comments any animals you'd like me to draw for you guys and be sure to check out some of my other blog posts on Danny's Blog.😊🐷

Friday 20 August 2021

Dots and Boxes Game

 Age Range: 6-11

Equipment needed: A4 sheet of squared paper and two pencils or two different coloured felt tip pens of your choice

Dots and Boxes Game
 
On this blog post, I will be showing a simple but fun 2 player game where the aim is to have the most points. This game only requires 2 items to play and I will be showing a step by step description on how to play the dots and boxes game.
 
To play the dots and boxes game:
 
Start by drawing a grid of dots on your squared piece of paper. You can make the grid of any size but i chose to do a 4x4 grid to show you.

Each player will take it in turns to draw either a vertical or horizontal line on two unmarked dots. As you can see from the image below, player 1 has drawn a pink line. Now it's player 2's turn.

Player 2 has now added a blue line on two unmarked dots.

Player 1 will then take their turn adding another line
 
Back to player 2 to add another line
 
As the game continues, both players will be adding lines on the grid similar to the image below
 
The aim of this game is to try and join the fourth side of a 1x1 box
 
Player 1 has now joined the fourth side of a 1x1 box
 
Due to player 1 now joining the fourth side of the box, they will get a point and will put a 'P' in that box to record the point.
 
Player 1 will now take another turn for winning the last point and they are again able to complete the fourth side of the box and get another point.
 
The game continues and now player 2 has been able to complete the fourth side of a box and gets a point and now as you can see have placed a 'B' to record the point.
 
The game keeps continuing with both players adding lines. Player 1 then adds another point for getting a box.
 
The game ends when no more lines can be placed for both players
 
The player is the person who has the most points
 
The winner in this game is player 1 who has 6 completed boxes compared to player 2's 3

Thanks guys and hope you enjoyed the blog post today. Be sure to leave a comment on how you found playing this game and be sure to check out our some of my other blog posts I have posted. 😊

Friday 13 August 2021

Zebra Palm Art

 Age Range: 4-11

Equipment needed: A4 sheet paper, black and pink felt tip pen

Zebra Palm Art
 
Have you ever wanted to learn how to draw a zebra? Well you can do this, simply by using the palm of your hand. ✋🦓

To draw your zebra:
 
Place your left hand on the piece of paper with all your fingers on the paper
 
Draw round your hand
 
Turn your paper round so that your hand drawing is facing the opposite way
                   
Curve round your hand drawing so that it all joins together and then add a small tail similar to the image below
 
In the little finger of your drawing, draw a small square in the corner and colour this in with a black pen. Add a small smile at the bottom of the square.
 
Add a small circle for the eye and add another circle in that eye. Only colour in the outer circle of the second circle with a black pen.
 
Add small lines on top of your hand drawing similar to the image below for the zebra's mane
 
In the other fingers you have drawn, colour a small section of them in with a black pen similar to the image below

 Draw lines close to your eye heading upwards with a black pen to represent the zebra's stripes

In the bottom of your fingers, draw sets of lines going towards the palm of your hand for the stripes
 
Draw lines with a black pen from the top to the bottom of your hand drawing similar to the image below
 
Add lines for stripes to the remaining part of the zebra including the tail as well
 
Draw a small butterfly close to the zebra similar to the image below

Colour your butterfly in with a pink pen
 
You have drawn your own zebra palm art

Watch the zebra palm art video:
 

Thank you and hope you enjoyed the blog post. Please leave in the comments how you found drawing your own zebra as well as any feedback you may have. Please also leave in the comments any animals you'd like me to draw for you guys and be sure to check out some of my other blog posts on Danny's Blog.😊🦓